
How to Create the Ultimate Indoor Putting Green
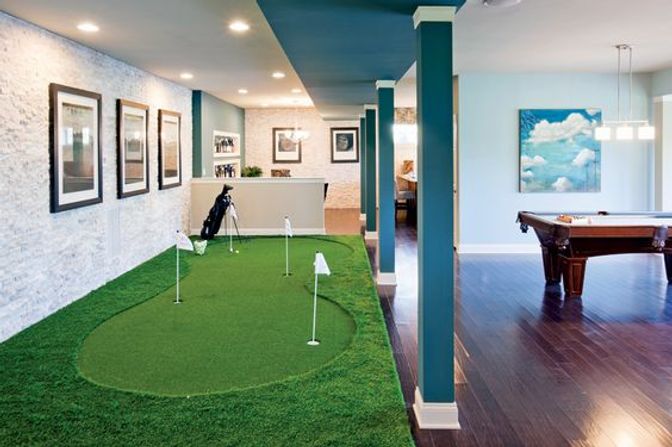
Having your own indoor putting green is a dream come true for golf enthusiasts. Not only does it provide a convenient way to practice your putting skills at any time, but it also adds an element of fun and relaxation to your indoor space. In this blog post, we will guide you through the process of creating the best indoor putting green using synthetic grass. With the right materials and a bit of effort, you can transform any room into your very own golfing haven.
Determine the Space:
Before diving into the installation process, it’s crucial to assess the available space for your indoor putting green. Measure the area accurately and take into account any obstacles or furniture that might hinder your putting stroke. Ideally, choose a room with enough space for a proper putting length and width.
Select the Right Synthetic Grass:
Choosing the right synthetic grass is paramount for creating an authentic and enjoyable putting experience. Look for synthetic grass specifically designed for putting greens. Opt for a high-quality product that mimics the texture and performance of real grass. Factors to consider include pile height, face weight, and backing material. Research different options and read customer reviews to make an informed decision.
Prepare the Surface:
To ensure a smooth and level playing surface, you need to prepare the floor before installing the synthetic grass. Start by removing any existing carpeting or flooring. Thoroughly clean the area to remove any debris or dust. Use a leveling compound or self-leveling concrete to even out any uneven spots or imperfections. Allow the compound to dry completely according to the manufacturer’s instructions.
Install the Synthetic Grass:
Now comes the exciting part—installing the synthetic grass. Roll out the artificial turf over the prepared surface, ensuring it covers the entire area. Trim off any excess grass using a utility knife. Secure the edges of the grass using adhesive or double-sided tape. Make sure the grass is taut and free of wrinkles or folds. If necessary, add infill material specifically designed for putting greens to enhance the ball’s roll and control.
Customise the Putting Green:
To create a truly personalized indoor putting green, you can add additional features. Consider installing cups or holes at different locations to practice varying putting distances and angles. You can also incorporate undulations and slopes by using foam padding or ramps beneath the turf. Experiment with different configurations until you achieve the desired difficulty level and challenge.
Enhance the Ambiance:
To complete the ambiance of your indoor putting green, consider adding some extra touches. Install adequate lighting to ensure proper visibility and create a pleasant atmosphere. Hang golf-themed artwork or memorabilia on the walls to inspire and motivate you during your practice sessions. Consider incorporating seating areas or a mini-golf-themed décor to make the space more inviting.
Creating an indoor putting green using synthetic grass is a fantastic way to improve your golf game and bring the joy of golf into your home. By following the steps outlined in this guide, you can create a top-notch putting surface that closely replicates the feel and performance of real grass. Enjoy endless hours of practice and fun without worrying about weather conditions or accessibility. With your own indoor putting green, you’ll be on your way to becoming a master of the greens in no time!